TL;DR
You can try my Traffic Sign Recognition Model in your browser: https://pollithy.com/gtsrb/index.html. The accuracy won’t overwhelm you ;)
This blog post explains how to build such a website.
Using tensorflow.js to run a Keras model in browser
Tensorflow.js is a reduced implementation of the tensorflow specifications. You can train models in javascript (+webgl) with it but only a subset of operations are implemented. The most common Keras layers can be used.
An introduction for beginners is this youtube video: https://www.youtube.com/watch?v=pbCExciEbrc
The exported Keras model
Tensorflow.js also has a python package which I used to export my Keras model for detecting German traffic signs from my previous blog post. The exported folder looks like this:
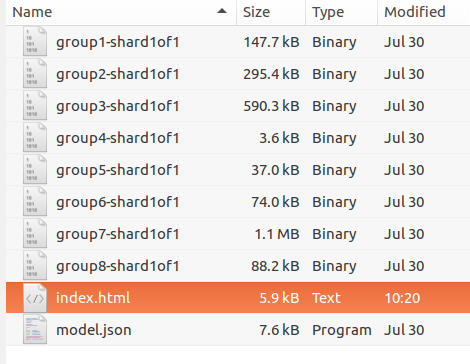
Keras usually stores the weights of its models with the big file format HDF5. As you can see there are eight single files in the directory which are the shards. Tensorflow.js exports smaller files in order to increase the caching abilities. The model.json file contains all meta information like “what is the topology of the model’s graph” or “where are the weights stored”.
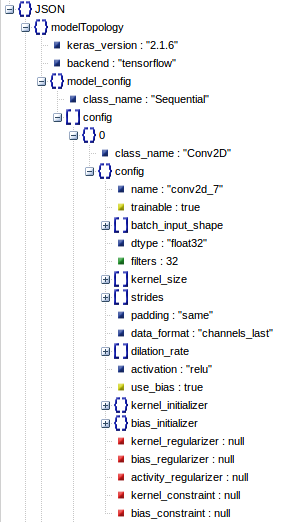
Inspecting the model.json shows what data is necessary to load a model in a completely different environment:

Every layer is described and the names of the attributes are concordant with the Keras API.
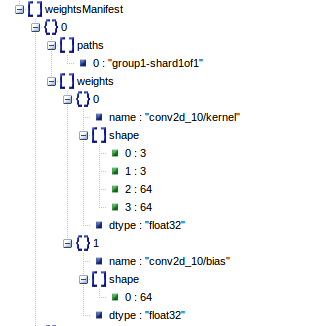
The “weights_manifest” explains what tensors are stored where, which shape and data type do they have and where should they become plugged in, once they are loaded.
Loading the model
I used the following resources to write a really simple webpage to load the model, upload an image and visualize the results. (I even used var in the javascript code, shame on me.)
Resources on how this can be done are:
- https://js.tensorflow.org/tutorials/import-keras.html
- https://js.tensorflow.org/tutorials/webcam-transfer-learning.html
HTML skeleton
The HTML skeleton is really simple. It consists of a form for the upload, a hidden canvas to grab the pixels from the image and a DIV to show the results.
<html>
<head>
	[...]
</head>
<body>

	<h1>German Traffic Sign Recognition</h1>
	<p>This convolutional neural network was trained using the GTSRB data.
       It achieved an accuracy of approximately 85% on the test set.
  	   This webpage uses tensorflow.js to load the model which was built using Keras.
    </p>

	<form action='#' onsubmit="return false;">
		<input type='file' id='imgfile' />
		<input type='button' id='btnLoad' value='Load' onclick='loadImage();' />
	</form>

	<canvas id="canvas" style="visibility:hidden;"></canvas>

	<div id="results"></div>
</body>
</html>
Tensorflow.js
Load the javascript library tensorflow.js from a CDN or such.
<script src="https://cdn.jsdelivr.net/npm/@tensorflow/tfjs@0.12.0"> </script>
After loading the model we store it at the window and persists the name of every class:
// Load the Keras model
model = tf.loadModel('model.json');

model.then(function(model) {
  window.keras_model = model;
  window.classes = [
    '20',
    '30',
    '50',
    '[...]',
    'Kreisverkehr',
    'Überholverbot für PkWs aufgehoben',
    'Überholverbot für LkWs aufgehoben',
  ];
}).catch(function(e){alert(e);})
Load the image on button click “load” in the form. This function does all of the magic:
- Load the image using a
new FileReader() - Draw the image onto the hidden canvas
- Predict the classes
- Display the result
function loadImage() {
      var input, file, fr, img;

      if (typeof window.FileReader !== 'function') {
        alert("The file API isn't supported on this browser yet.");
        return;
      }

      input = document.getElementById('imgfile');
      else if (!input.files) {
        alert("This browser doesn't seem to support the `files` property of file inputs.");
      }
      else if (!input.files[0]) {
        alert("Please select a file before clicking 'Load'");
      }
      else {
        file = input.files[0];
        fr = new FileReader();
        fr.onload = createImage;
        fr.readAsDataURL(file);
      }

      function createImage() {
        img = new Image();
        img.onload = imageLoaded;
        img.src = fr.result;
      }

      function predict() {
        // see below
        [...]
      }

      function imageLoaded() {
        var canvas = document.getElementById("canvas")
        canvas.width = 32;
        canvas.height = 32;
        var ctx = canvas.getContext("2d");
        ctx.drawImage(img, 0, 0, 32, 32);

        predict();
      }

      function show_result(top_n, data) {
         // see below
        [...]
      }
    }
Predict
The function predict() was omitted so we can take a more detailed look at it now.
Tensorflowjs also uses graphs and you cannot access the results of the operations by simply using the operations variables.
function predict() {
  // Get the pixels from the canvas
  var canvas = document.getElementById("canvas")
  tensor = tf.fromPixels(canvas)

  // convert the int8 rgb values which are from 0 to 255
  // to float values -> this is how the model was trained ]0, 1]
  float_tensor = tensor.toFloat().div(tf.scalar(255));

  // Make sure the image has the correct size under every circumstance
  sized = tf.image.resizeBilinear(float_tensor, [32, 32])
  // The predict method of a model works on batches of images so
  // we wrap the single image into a batch
  batch = sized.expandDims(0);

  // this returns an operation and not an array
  predictions = window.keras_model.predict(batch)

  // evaluate the operation and grab the data
  predictions.data().then((data) => {
    // data is a TypedArray
    console.log(data);
    // convert it to a usual Array
    var data =  Array.prototype.slice.call(data);

    // We could use tensorflowjs to get the best prediction
    // result = predictions.as1D().argMax();
    // result.print()
    // result.data().then(function(res) {alert(window.classes[res]); })

    // But we want to get the top 5 guesses so we use a custom function
    var top_n = get_top_n(data, 5);
    show_result(top_n, data);
  })
}
Top n predictions
The following function returns the top n indices from an array in javascript. I am sure that there are simpler solutions but none of them is as short as the numpy version would be (arr.argsort()[-n:][::-1]).
function get_top_n(iterable, n) {
  var top_n_idx = [];
  var max_ = 0;
  var candidate;

  // make a copy
  var ary = iterable.slice();

  // iterate n times
  for (var i=0; i<n; i++) {
    max_ = -1;
    candidate = null;

    // get the max entry
    for (var c=0; c<ary.length; c++) {
      if (max_ < ary[c]) {
        candidate = c;
        max_ = ary[c];
      }
    }

    top_n_idx.push(candidate);

    // take the max entry out of the race by setting it
    // to a low value
    ary[candidate] = -1;
  }

  return top_n_idx;
}
Visualize
The last part was to show a list of the results:
Some styling for the result items:
.container{
  display: flex;
  margin: 5px;
  border: solid;
}
.fixed{
  width: 200px;
}
.flex-item{
  flex-grow: 1;
}
And the function that creates a new result item.
function show_result(top_n, data) {
  // A flexbox container with a div on the left side and
  // one on the right side
  var d = document.createElement('div');
  d.className = "container";
  var d2 = document.createElement('div');
  d2.className = "fixed";
  var d3 = document.createElement('div');
  d3.className = "flex-item";

  // A canvas to show the image
  var c = document.createElement('canvas');
  c.width = 32*4;
  c.height = 32*4;
  var ctx_large = c.getContext("2d");
  ctx_large.drawImage(img,0,0, 32*4, 32*4);

  // Add the image on the left side
  d2.appendChild(c);

  // Add a list of top n predictions on the right side
  var ul = document.createElement('ol');
  for (var i=0; i<top_n.length; i++) {
    if (data[top_n[i]]) {
      var txt = window.classes[top_n[i]] + " " + data[top_n[i]].toFixed(2); + ",";
    } else {
      var txt = "null";
    }
    var li = document.createElement('li');
    li.innerHTML = txt;
    ul.appendChild(li);
  }
  d3.appendChild(ul);

  d.appendChild(d2);
  d.appendChild(d3);

  // the container for all results
  var results = document.getElementById("results");

  // insert the new result at the beginning of the list
  results.insertBefore(d, results.firstChild);
}
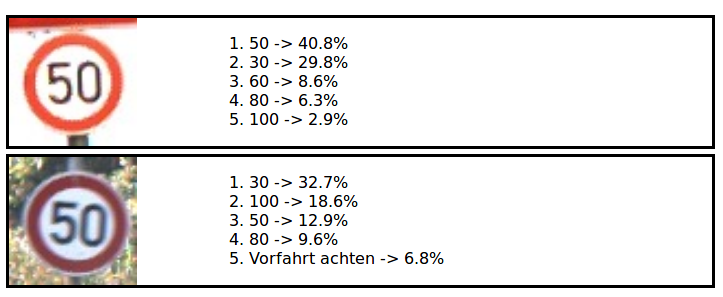
The result
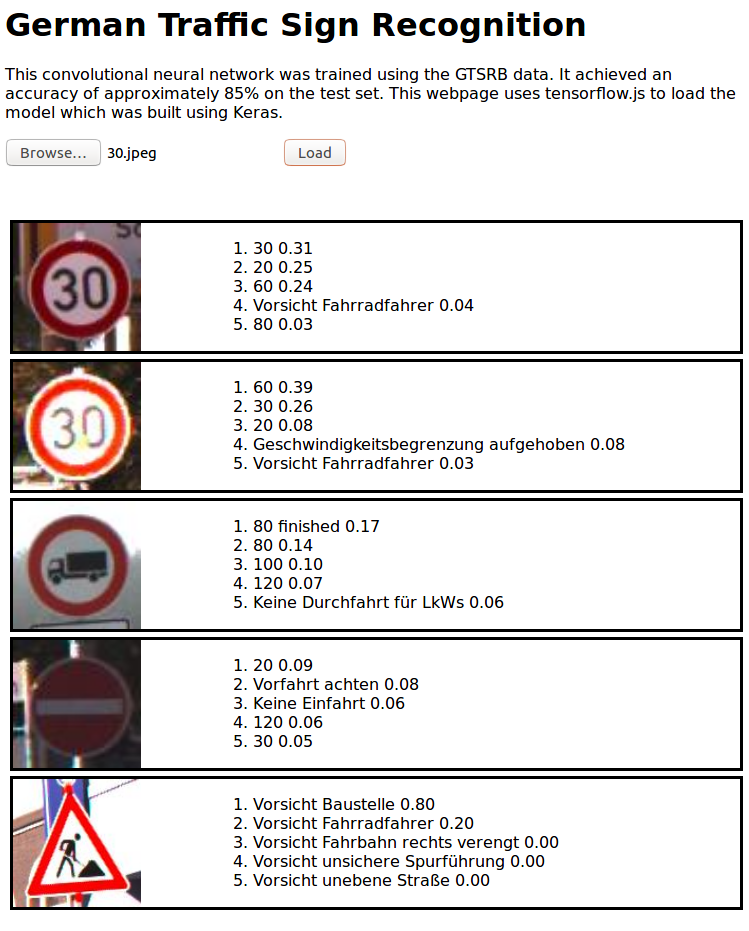
I host the application at https://pollithy.com/gtsrb/index.html
